How to Stitch Photographs together
Following on from yesterday I will give the workflow order for panorama construction. This is as much for me as from any altruistic intention to aid you, but hopefully we will both benefit. I can practice using Snagit and you will see how easy the process is.
The software used is Photoshop Elements 7, Elements 6 will do as the stitching software is the same and as good as I've found. Unless you want 360°/180° panoramas for planet construction or whatever. This is a better program than in the full version, though CS4 might have the same thing.
The hardware consists of a tripod and camera with cable release, you can use the self timer if you haven’t a cable release.
For this example I am going to use the three images taken yesterday, There is no real limit to the number you can use and you can join them vertically or horizontally or both, so if you want more depth to the final panorama take vertical overlapping images and then horizontal. A panoramic tripod head would be nice, but so is the price, needless to say I don’t have one.
Set up your tripod as near plumb as you can, mine has a bubble level built in, then mount the camera in either landscape or portrait orientation. Set it to aperture priority, I capture everything in RAW, if you don’t have this option don’t worry it just means you may be wise to bracket your exposures, not bad practice anyway. Photoshop can recognise and correct for differences in exposure------Nearly always!
You will need to set the aperture to f18+ to get depth of field. Set focus to manual, this is just to reassure skeptical Luddites like me that the thing is not shifting focus all over the place though it shouldn’t matter with this aperture.
Start either at the left or right, take the first image, swivel the camera to the new view overlapping the first one by 20% or so, this isn’t critical, and then repeat for your final frame.
Go home and download the exposures into Elements Organiser.
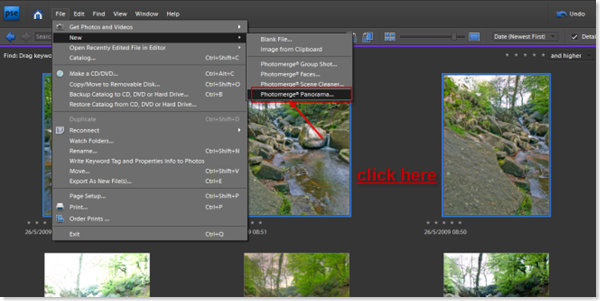
Find the images. Click on the first one hold down the shift key and click on the last, all should now be selected. Go to File-New-Photomerge Panorama and click.
If you have captured your images in Camera RAW then the next screen to appear should be the raw converter.
Select the images one at a time, select 16 Bits/Channel and try Auto in the right hand box If you get two black arrow heads in the histogram box then it's about as good as it's going to get. Repeat for the other two images. When you have got things perfect or in this case barely acceptable click the depth box and reduce to 8 bits/channel. Elements can't work in 16bit mode. You should then see the screen below.
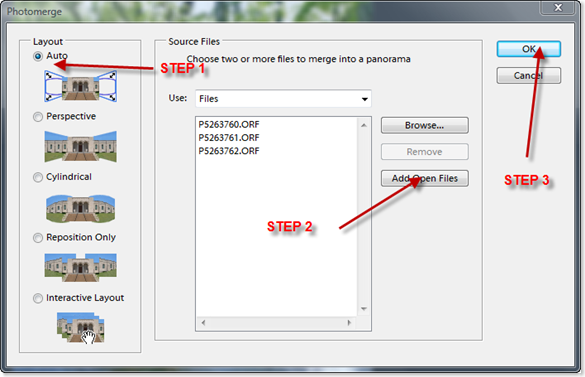
This is how things should look after editor opens. Check that the layout radio button Auto is selected. Click Add Open Files. Select OK.
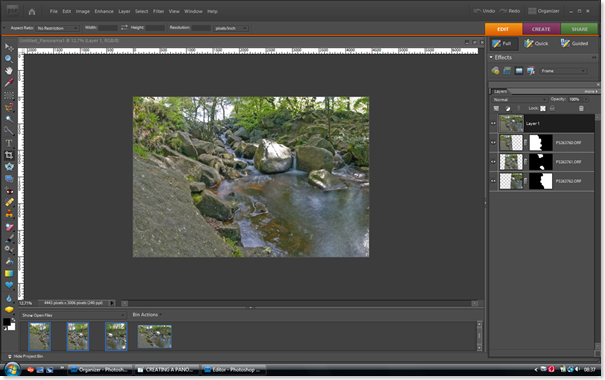
Go and make a cup of tea and let the program do it's magic. Should you have plenty of RAM memory it only takes a minute. You may notice some fine white lines, these are mask joins. Don't worry just press ctrl+shift+alt+E (Stamp Visible command) and they will go. The next step is to crop the image.
You should end up with something similar to the screen grab below.
The job is done at this stage but can be further enhanced by entering the layers pallet and adjusting, levels, brightness contrast, saturation. If you manipulate the image this way you can always delete or cancel a layer, this is the basis of nondestructive editing and a better way than using enhance in the tools menu.
[If you want to use enhance and get back quickly there is Undo at the top right of the screen or ctrl+Z does the same job. Better still, drag Layer 1 to the little square with the turned up corner, this will give you a duplicate Layer to work on.]
When you see the above screen click on the shadows control hold down the alt key and you will get a white screen slide the button towards the right till you start seeing some yellow then back off a bit. Repeat the same for the highlights, this time it's a black screen and red shows highlight clipping. The middle slider is a Gamma control and globally brightens or darkens the image.
Brightness/Contrast is accessed the same way as Levels. Again play with the sliders till your hearts content.
Click the adjustment layer icon, you know where it is now! Select Hue/Saturation and slide about till the picture looks good, surreal, or even monotone. For the latter just shove the saturation slider all the way to the left. In the Saturation controls you can select from master and any of four or five colour channels. this is good if you want to tone down say greens whilst leaving other colours relatively unaffected.
That's about it, it just remains to flatten the image. Don't do this if you want to continue editing. Next save your image, I tend to save as tiff then do what I want with them later,
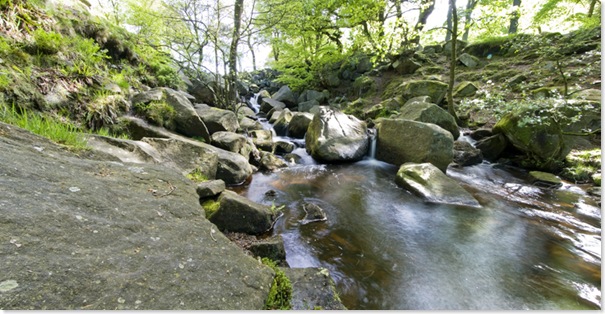
VOILA THE FINISHED JOB!!
Please feel free to criticise, I've been on this Blog malarkey for a few weeks and it's 'CANARD'!!
Thanks Rodney "Only Fools and Horses"


No comments:
Post a Comment